
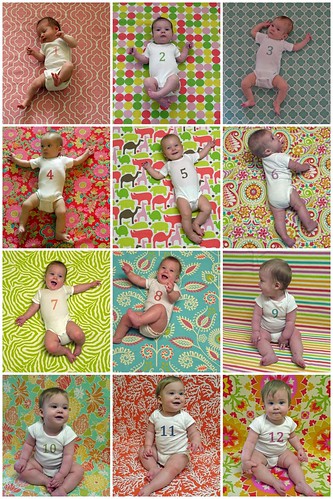
I'm really happy with how Claire's photo project turned out. During the eight month photo, we couldn't keep her on her back for more than a second, so we switched to sitting up. The nine, ten, and eleven month photos were such a breeze that I started thinking about keeping the project going until she was two. Maybe taking pictures every three months instead or something. But her twelve month photo was basically a disaster {she's eating popcorn in every outtake} and totally convinced me that it needed to be the last one.
I want to try my best to do monthly photos like this with her future siblings too. I think keeping it up until age two would have been way too hard to maintain for other kids, so I'm glad this project reached a very natural stopping point. The biggest thing I would change the next time around {besides magically becoming a much better photographer} is purchasing a 1.5 yards of the last fabric, instead of the usual one yard. I started my sewing projects six weeks before her birthday, but I couldn't finish them until the last minute because I was waiting on the fabric and we wanted to take her twelve month photo as close to her birthday as possible.
On to what I did with all of that fabric! It was always my goal to make a very simple quilt, but I also decided to make a doll quilt and some bunting. I have never quilted anything before in my life, so the doll quilt was great practice for the larger one.

My purchased supplies for the quilts were pre-made quilt binding and a crib-sized sheet of batting. I also bought a rotary cutter and a small cutting mat, which were amazingly helpful for straightening things up in the end. I used fabric I already had for the backing and leftover batting from our pelmet boxes for the doll quilt. For this quilt, I cut each strip of fabric to be 2.5 inches wide and 20 inches long. My goal was for the quilt size to be 24 inches long and 18 inches wide. As I'm sure you can tell, the strips ended up being quite different sizes once I sewed them together, so the final result is a little off from what I intended.
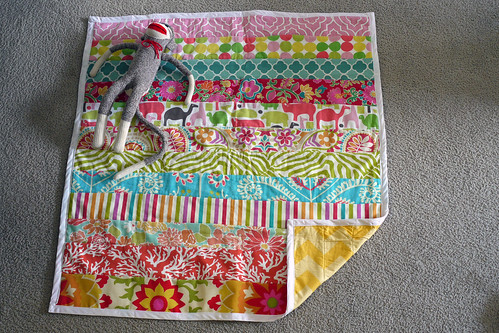
Claire's monkey volunteered to demonstrate the size difference! I used the same yellow chevron fabric as backing for both quilts. It's also leftover from our pelmet box project. For the bigger quilt, I cut each strip of fabric to be 4.5 inches wide and 40 inches long. My goal was for the quilt size to be 48 inches long and 36 inches wide. Starting with the smaller quilt first really helped me make the strip size {when sewn together} a lot more consistent on this one. I used a quilt-as-you-go method, following the instructions from this video. I haven't tried the more traditional way, but this seemed pretty straightforward and involved way less pinning, my least favorite part of any sewing project. I found this tutorial really helpful for attaching the binding, which I did all by machine.
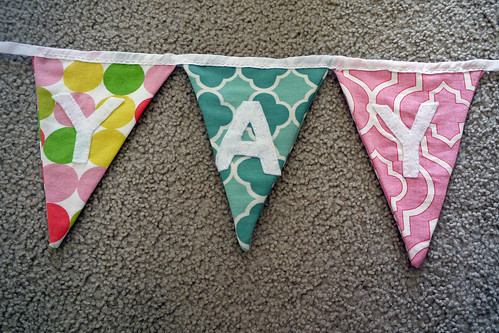
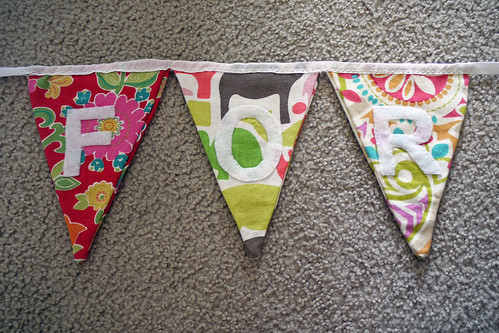
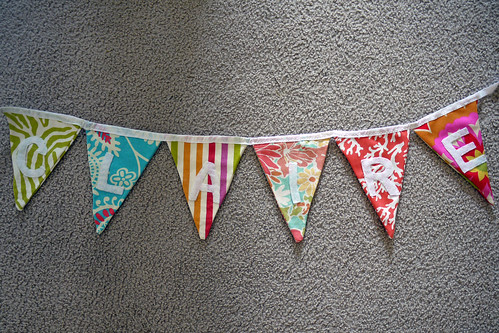
For the bunting, I purchased felt, embroidery floss, and bias tape. I made a cardboard triangle template and used it two cut two triangles for each type of fabric. I printed letters in Arial font to say "Yay for Claire" because it's exactly twelve letters and because I wanted to use this banner for all sorts of special occasions. Then, I traced the letters onto white felt and sewed each onto one triangle by hand. I used my machine to sew that triangle to it's partner. I left the top open and then sandwiched each triangle between the two layers of the bias tape, attaching them by hand. One package of bias tape was exactly enough. You can see the whole thing in this post about her first birthday party.
I am also planning to make Claire a photo book with all of these photos and the corresponding monthly update blog posts. It will hopefully serve as a baby book, of sorts. I'll definitely share once it's finished.
P.S. This experience definitely showed me that I don't have what it takes to be a quilter! I am not enough of a perfectionist, that's for sure.
Claire's monkey volunteered to demonstrate the size difference! I used the same yellow chevron fabric as backing for both quilts. It's also leftover from our pelmet box project. For the bigger quilt, I cut each strip of fabric to be 4.5 inches wide and 40 inches long. My goal was for the quilt size to be 48 inches long and 36 inches wide. Starting with the smaller quilt first really helped me make the strip size {when sewn together} a lot more consistent on this one. I used a quilt-as-you-go method, following the instructions from this video. I haven't tried the more traditional way, but this seemed pretty straightforward and involved way less pinning, my least favorite part of any sewing project. I found this tutorial really helpful for attaching the binding, which I did all by machine.
For the bunting, I purchased felt, embroidery floss, and bias tape. I made a cardboard triangle template and used it two cut two triangles for each type of fabric. I printed letters in Arial font to say "Yay for Claire" because it's exactly twelve letters and because I wanted to use this banner for all sorts of special occasions. Then, I traced the letters onto white felt and sewed each onto one triangle by hand. I used my machine to sew that triangle to it's partner. I left the top open and then sandwiched each triangle between the two layers of the bias tape, attaching them by hand. One package of bias tape was exactly enough. You can see the whole thing in this post about her first birthday party.
I am also planning to make Claire a photo book with all of these photos and the corresponding monthly update blog posts. It will hopefully serve as a baby book, of sorts. I'll definitely share once it's finished.
P.S. This experience definitely showed me that I don't have what it takes to be a quilter! I am not enough of a perfectionist, that's for sure.
oh my gosh, wanna make me a quilt?!
ReplyDelete