Showing posts with label Craft Projects. Show all posts

2.28.2017

Betsy's Photo Project

First Year Collage

Another successful twelve month photo project in the books! 

P1230711

P1230712

P1230713

For her birthday banner, I followed the instructions I helpfully left for myself in this post. I even saved the cardboard template! Since Betsy's name is only five letters long, not six like Claire and Maggie, she got an exclamation point added on. 

P1230709

But, I switched it up and made a different style of quilt. Claire's and Maggie's are striped, which was hard to keep straight with my basic sewing skills. Adam's mom, who is an amazing quilter, told me that twelve squares would be much easier to do well. She was definitely right! I used the quilt-as-you-go method for the big girls' quilts, so this time I had to get over my fear of sewing the finished front piece to the backing. I made her a doll quilt first to practice. 

P1230708

But thankfully it went off without a hitch both times! I continued my tradition of using yellow fabric for the backing because yellow just always makes me happy. Until they have a favorite color of their own, I'm going with my favorite color! I used store-bought white quilt binding. I know a real quilter was always make her own binding (and hand-stitch, no less) but I am absolutely not a real quilter and I like how the white looks with all the other busy patterns. 

I am planning to make her a Blurb photo book with all her monthly photos and the corresponding blog posts, just like I did for her big sisters. My goal is to have it finished by her half birthday...

Thus concludes Betsy's birthday celebration on the blog. Now I'm off write a to-do list for Claire's birthday party - I'm not used to having children's birthdays close together like this!

6.26.2015

Stuff I've Made Lately

Three of our six rooms now have curtains! 

P1170821

P1170825

I used the same yellow fabric in the nursery and the guestroom, since the twin beds and cribs might be rearranged at some point when more kiddos are added to the mix. I made them both black-out curtains just by clipping the lining to the yellow fabric with ring clips. Mostly because I'm lazy, but all because that way it will be easier to reuse the components in the future. 

P1170823

In our bedroom, I actually reused an old shower curtain from our first apartment. 

P1170824

My other much more challenging sewing project of late was making these sundresses for the girls. 

P1170827

I used a pattern from the book "Sew Classic Clothes for Girls." I found the pattens much harder to understand than the other sewing book I've purchased  "Oliver + S Little Things To Sew."

IMG_1277

But I persevered eventually! Here are the girls modeling their new dresses at Mass on Sunday. 

P1170828

Finally my other favorite hobby - making photo books in Blurb. I finished our 2014 family yearbook and Maggie's baby book. They follow the same format as the ones I show you in this post.

P1170831

I also ordered Chat Books of my favorite Instagram photos, one for each year of my babies' lives. I actually ordered two copies of each book, one to put away for later and one for the girls to look at, which explains why these ones look a little beat up. 

P1170833

Just seeing all of these displayed on the bookshelf makes me happy!

4.14.2015

Stuff I've Made Lately

For Claire's birthday, we added a back to the play kitchen. 

P1160905

It was a very simple project, just too overwhelming to accomplish at Christmas, when we made the rest of the play kitchen.

P1160906

We also added a phone and a mailbox to the blank side. I'm itching to spray paint the mailbox a fun color when it's warm enough outside.

P1160908

We painted a thick piece of plywood with some turquoise paint to match the fridge shelves. We pulled the mirror and little shelf out of storage. I cut a dishtowel in half to make the curtain - just hemmed the rough edge and added some pompom fringe. We already had the ring clips and painted a dowel white for the curtain rod. Adam set everything up while Allie and I were getting ready for the party on Claire's birthday eve.

P1160912

Try as I might, I only got blurry pictures of Claire wearing her Easter present. She requested a purple cape "just like Elsa." I used a little red riding hood pattern from this book, which I previously used to make her a baby doll carrier. I bought two yards of a basic purple fabric and used a gingham from my stash as the lining.  I'm quite proud of how it turned out, but the recipient hasn't been a huge fan because apparently Elsa's cape doesn't have a hood.

P1160911

For Maggie's Easter gift, I gave her a doll that matches one I made for Claire a couple Christmases ago. I used the same Bit of Whimsy Dolls pattern. This one came together much quicker. It was gratifying to know my sewing skills are slowly improving.

P1160909

The two sister dolls together!

P1160902

In the past month, we also made Claire's crib into a toddler bed. We purchased two new sets of sheets and a changing pad cover on clearance at Land of Nod for the occasion. She's taken to sleeping in it very easily, maybe because we waited so long to make the switch.

P1160901

Next up: finally making curtains for the bedrooms and sewing matching sundresses for my girls! Adam gave me a sewing book last Christmas that I haven't had a chance to use yet. I found some really cute fabric that I can't wait to use.

1.14.2015

Play Kitchen Details

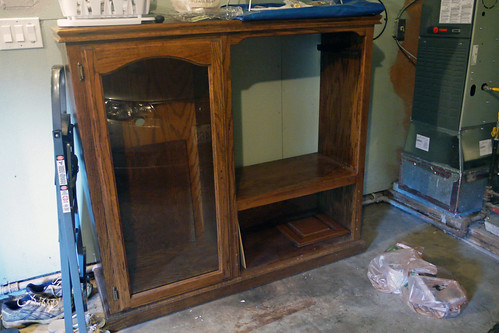
Last January, I bought an old entertainment center at Goodwill for $25. After sitting on the balcony of our old apartment and then in our garage here for many months, we finally got around to transforming it into a play kitchen for the girls' Christmas present. Here's what it looked like before we got started: 

P1150577

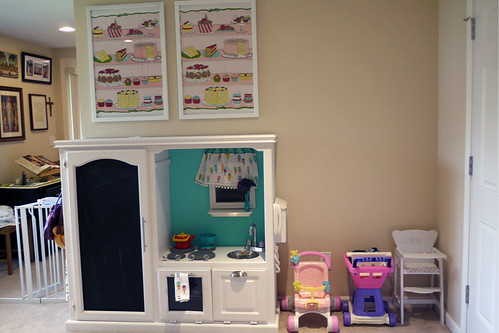
And here's what it looks like today!

P1150962

Beginning in mid-November, we...
 
- removed all the old handles
- removed the "oven" and "dishwasher" doors
-  cut holes for the sink and faucet
- cut and installed a plywood divider for between the oven and dishwasher
- cut plexiglass for the oven door
- cut a hole in the oven door for the plexiglass
- cut chalkboard to replace the glass in the fridge door
 
We finished all of the above by the end of Thanksgiving weekend. We spent the next two weeks priming and painting the entire thing. This was by far the hardest part!


The week before Christmas, we...
 
- installed the sink and faucet (we used silicone caulk to adhere the rim of the sink to the counter) 
- attached the stove burners and stove knobs
- screwed little hooks in the sides of the oven for the cooling rack
- installed the door handles
- installed the plexiglass in the oven door with heavy-duty velcro
- installed lights in the fridge and oven with heavy-duty velcro
- reinstalled the oven and dishwasher doors
- secured the chalkboard in the fridge door opening
- added the cooling rack to the oven and the dish rack to the dishwasher
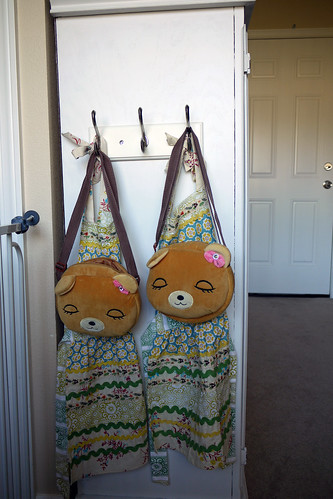
- attached a hook rack on the side of the fridge for aprons
 
Once the girls were in bed on Christmas Eve, we brought the kitchen into the playroom. After we anchored it to the wall, we set up all their play food and dishes inside. (We have felt food from Ikea and wooden food from Melissa & Doug. Dishes are from my own childhood with the exception of some Ikea pots.)
 
Now for some close-ups...
 
P1160052
 
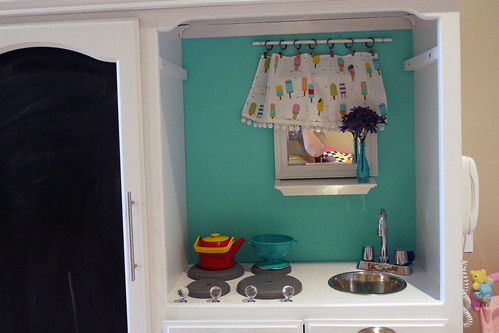
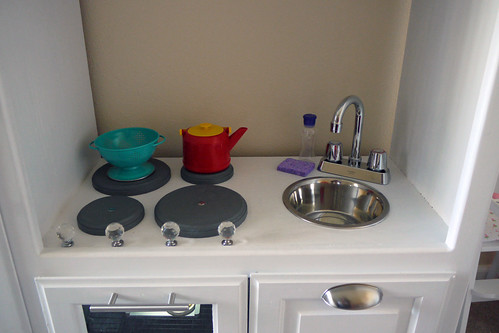
The sink is actually a dog bowl from Target and the bar faucet is from Amazon. The stove burners are just wooden rounds from JoAnn's and the knobs are from Home Depot.
 
P1160055
 
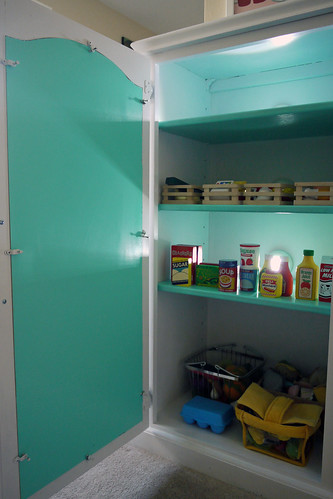
We thought we'd have to buy special fence hinges so the doors would stay up when installed this way, but the original hinges work just fine.
 
P1160054

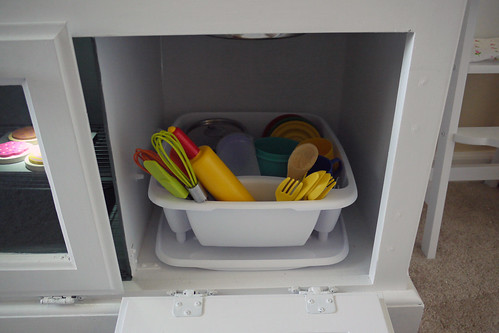
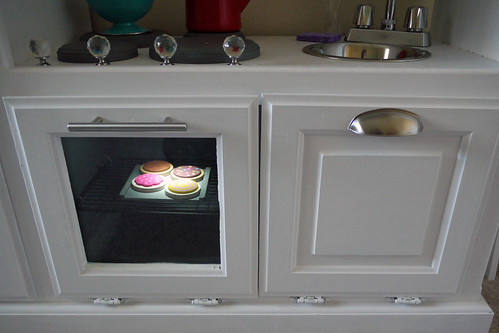
The dishwasher - a basic dish rack from Target loaded up with their stash of pretend cookware.
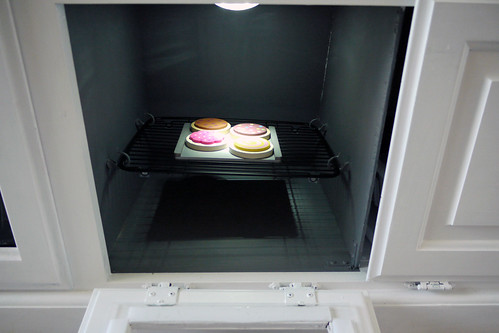
 
P1160056
 
The oven - we put a touch light in the ceiling so it can be "turned on." After lots of searching for the required dimensions on Amazon, we bought this sink rack.
 
P1160060
 
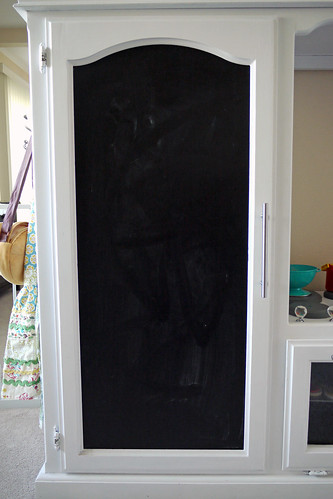
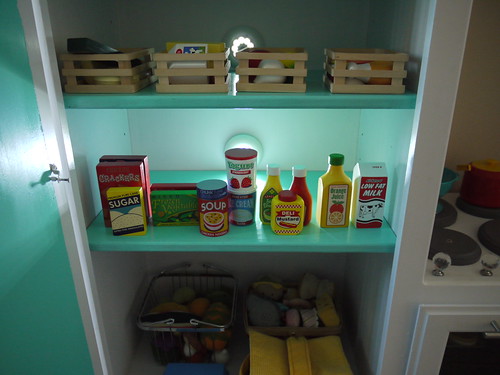
And here's the refrigerator. All the door handles are from Home Depot, by the way. The old hinges are bronze, so we painted them white but it's already peeling. I think we'll eventually replace them for coordinating silver ones.
 
P1160058
 
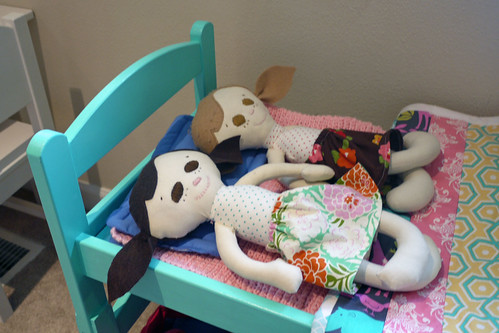
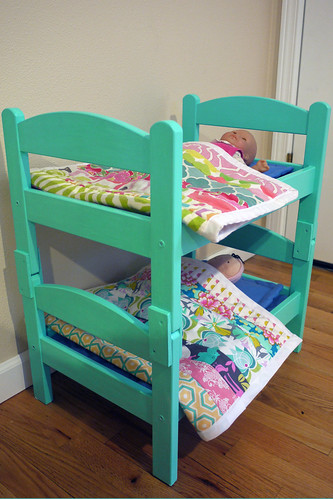
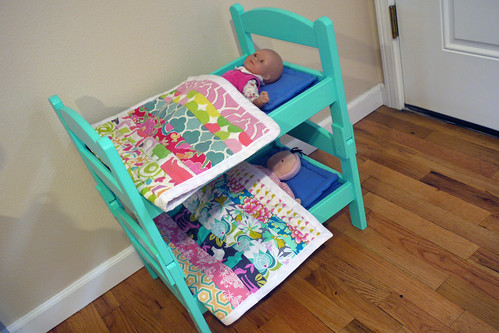
We painted the shelves and the back of the chalkboard with turquoise paint left over from the doll bunk beds. It was nice to add in some color without much more effort. (Painting the whole fridge interior a different color would definitely have been more work!)
 
P1160059
 
There were some holes in the back for tv cords and cables, so we used some more touch lights to cover those up. It's handy that they also give it more of a fridge feel.
 
P1160051
 
The darling Anthropologie aprons were a splurge a while back. I have the coordinating adult apron, oven mitts, and potholders so I just couldn't resist. The hook rack is from Target and my mom brought back the little purses from China.
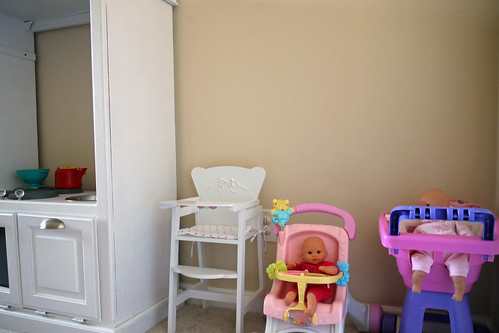
 
P1160061
 
Adam's mom sent this high chair for Christmas, so that was another fun surprise. Claire immediately started feeding her dolly breakfast on Christmas morning.
 
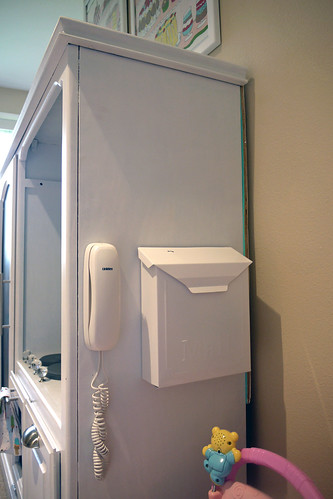
For Claire's birthday in March, we plan to add a few extras. To that blank wall, maybe a corded phone, a mail box, or a bar for dish towels? We'll add a back above the sink/stove area, wallpapered or painted a fun color, with a little window and curtains, etc.
 
We took all of our inspiration from Young House Love and Southern Revivals.
 
Here was the rough budget breakdown:
 
Entertainment Center - $25
Hook Rack - $12
Faucet - $21
Dog Bowl - $17
 Oven Rack - $12
Dish Rack - $6
Touch Lights - $28
Plywood - $10
Chalkboard - $10
Plexiglass - $10
Stove Knobs - $24
Door Handles - $22
Corner Braces - $9
Plexiglass Cutting Tool - $5
Quart of Primer - $10
Test Pot of Gray Paint - $3

Grand Total = $224

So, it was certainly a lot more expensive than one of those cute KidKraft kitchens, but it's also considerably bigger and sturdier. We're hoping those factors will give it more longevity. It was also considerably cheaper than a well-constructed kitchen like one you'd find at Pottery Barn Kids.

Whew! It was a lot of work, but so worth it to see their excited faces on Christmas morning. Maybe next year we'll build them a grocery stand to go with it?

11.10.2014

Maggie's Photo Project

One Year!

We successfully completed this monthly photo project with two kids! Just like her big sister, Maggie was definitely ready to be done by twelve months and is also being bribed with popcorn in all of those pictures. 

 I debated about using a different pattern for Maggie's quilt, but in the end I decided to keep it consistent. I thought I would do a better job my second time around, but nope, Maggie's is just as wonky as Claire's. I mean, made with love, right? I apologize in advance for how terrible these photos are - it's so hard now that we rarely have natural light to work with!

P1150516

I made this doll quilt, first, as a warm-up of sorts. This time, I used cardboard templates to cut all the fabric strips, which made things a lot easier. I wanted the quilt to be 24 inches long and 18 inches wide, so I cut each strip to be 2.5 inches wide and 20 inches long. I had enough leftover batting and quilt binding in my stash for this one.

P1150520

The sock monkey volunteered to demonstrate the size difference! I wanted this quilt to be 48 inches long and 26 inches wide, so I cut each strip to be 4.5 inches wide and 40 inches long. I picked a pretty yellow fabric for the backing to coordinate with Claire's quilt. I needed two packets of quilt binding and a crib-size length of batting. This video was really helpful for explaining the quilt-as-you-go method and this tutorial was essential for understanding how to attach the binding.

P1150521

P1150522

P1150523

For the banner, I needed two sheets of white felt, two packets of white embroidery floss, and one package of double-fold bias tape. I printed the letters in Arial Bold 250 point. The triangles are seven inches wide, across the top, and nine inches long. You can see the whole thing in this post about her birthday party.

P1150524

P1150527

P1150525

Maggie's other birthday present was set of doll bunk beds. We bought two of these doll beds from Ikea, bunked them, and then painted. They've been a big hit so far!

I'm still planning on making her a photo book with all of her monthly photos and updates, just like I did for Claire. I probably won't get around to that until January though, when I'm working on our annual family yearbook. 

A post on our process for taking and editing these monthly photos is in the works!

3.21.2014

Claire's Birthday

Claire turned two last Thursday! On her big day, she woke up to a present of dress-up clothes (a tutu, feather boa, and a few things from the Target dollar spot - a hat, wand, and bunny ears) and her favorite breakfast of chocolate croissants. Oh, and Aunt Allie, who I had picked up from the airport the night before!

Aviary Photo_130398274018433160

This is the best picture of the little "two" shirt I made for her. I just printed a two (Arial font in the biggest size that would fit on a sheet of paper) traced it onto some fabric and appliqued it onto a Target shirt.

Aviary Photo_130398277770613210

It was a beautiful spring day, so we walked over to the park.

Aviary Photo_130398275841786070

Our friend Steven (who we know from college and just moved here to work for Adam's company) joined us for dinner. We had pizza, salad (Claire insisted on licking the Italian dressing off each piece of lettuce - weirdo) and éclairs for dessert. Get it?

Aviary Photo_130398281011342780

By the end of the day, our poor little girl had come down with yet another cold and has been grumpy pretty much ever since. So I guess we're being ushered into the terrible twos properly!

We arbitrarily decided that we'd wait until Claire turned two to take her for her first hair cut, so on Saturday that's exactly what we did. Allie watched Maggie while Claire got out on a special date with just mom and dad. For this very first time, we splurged on the fancier kids' salon at the mall.

Aviary Photo_130398281711315731

Aviary Photo_130398282251158541

Aviary Photo_130398283061971071

She sat on Adam's lap and didn't exactly love the process, but didn't cry either. I really thought about doing something drastic, like a cute little bob, but in the end we just went with a trim to even things out.

Aviary Photo_130398284082674491

We intended to let her loose in the big indoor playground there, but with the whole sickness issue, we gave it a pass. I think the chocolate cupcake made it up to her though.

Aviary Photo_130398284753200091

We did some shoe shopping at Stride Rite, which is sneakily located next to the Disney Store. Since we're suckers and couldn't say no to the birthday girl, we went in.

Aviary Photo_130398286932795841

She picked out two little Minnie Mouse dolls and declared that one was for "sister," which was pretty much the sweetest thing ever, so we let them come home with us. Have I mentioned that we're really big suckers?

We ended the birthday celebrations with a simple party after Mass on Sunday.

Aviary Photo_130398287856642591

We made quiche, a veggie tray, fruit skewers, and an amazing peanut butter chocolate cake. Well, actually Allie made the cake while she was watching Maggie on Saturday. She's the best! Since we knew some guests were cutting back on sweets, we tried to make an infused water instead of serving lemonade or something. But it turns out that just slicing up some lemons and limes and leaving them in water overnight is absolutely not how to infuse water. So, so sour. Yuck.

Aviary Photo_130398288563997121


For the decorations, we hung up some tissue paper pom-poms saved from last year's party and a few lanterns from the Target clearance rack. I also printed some favorite Instagrams at Walgreens and taped them to the chalkboard we used to baby-proof the fireplace in our old apartment.

Aviary Photo_130398293787160592

We set up our folding table in the living room, decked out with our family birthday napkins and table runner. We hung Claire's birthday banner over the mantle and tossed some Claire-related art up there.

Aviary Photo_130398289281182542

We ate lunch, watched her birthday video, opened presents, and dug into that cake. It was even better than it looks!

Aviary Photo_130398290338325302

Aviary Photo_130398292430460722

In addition the dress-up clothes she opened on her actual birthday, we also gave her some Mega Blocks and a tool set. Oh, and I made her a pillow! I don't know anything about embroidery, so I basically just winged the whole thing, but I'm pretty happy with how it turned out.

Aviary Photo_130398506324400682

Aviary Photo_130398506867642562

Allie made her the cutest little cape. There's even one for her beloved dolly!

Aviary Photo_130398509024764732

Of course, Claire did not at all appreciate the presents we lovingly sewed for her. Stinker.

Aviary Photo_130398293033513582

And that's a wrap! Maybe next year will be the start of the themed parties? I thought about doing a Madeline themed one this year (Claire is obsessed with the books and show) but I'm so glad we kept it simple instead. I'd love to continue the tradition of some solo time with mom and dad. Maybe for turning three we'll do a first trip to the movies?